Contents
- Branching
- Merging and Rebasing
- Remote URLs
- Forks
- Stashing your work
- Commit-related tricks
- Tagging
- Ignore tracked files
Branching
Create a new branch
Create a new branch from scratch
Before creating a new branch pull the changes from upstream, since your master needs to be up to date. Then :
$ git checkout -b [name_of_your_new_branch] # Create the branch on your local machine and switch in this branch
$ git push origin [name_of_your_new_branch] # Push the branch on github
When you want to commit something in your branch, be sure to be in your branch. You can see all branches created by using git branch.
Create a new local branch and make it track the remote branch that was already there
git branch -a will list all of the remote branches that are available to pull from the repo, e.g.:
$ git branch -a
* master
  remotes/origin/HEAD -> origin/master
  remotes/origin/features/redball-shanghai
  remotes/origin/gh-pages
  remotes/origin/master
To create a new repo and make it track one of the listed branches, simply type:
[alecive@malakim]$ git checkout -b features/redball-shanghai origin/features/redball-shanghai
A git pull should not be necessary.
Delete a remote/local branch or tag
Delete a branch
Assuming that yours is a branch called bugfix, you have to do the following:
$ git branch -D bugfix    # locally
$ git push origin :bugfix # remotely
Delete a tag
Local tag deletion is similar to local branch deletion. But if you want to delete remote tag, then the syntax is a little different:
$ git tag -d <tag name>                 # locally
$ git push origin :refs/tags/<tag name> # remotely
Copy files between branches
To copy a file from one branch to another, e.g. from the experiment branch to the master branch,
$ git checkout master                 # get back to master
$ git checkout experiment -- file.txt # copy the version of the file from "experiment"
Merging and Rebasing
In Git, there are two main ways to integrate changes from one branch into another: the merge and the rebase.
Let us assume that we have this setup, in which experiment branch has diverged from master:
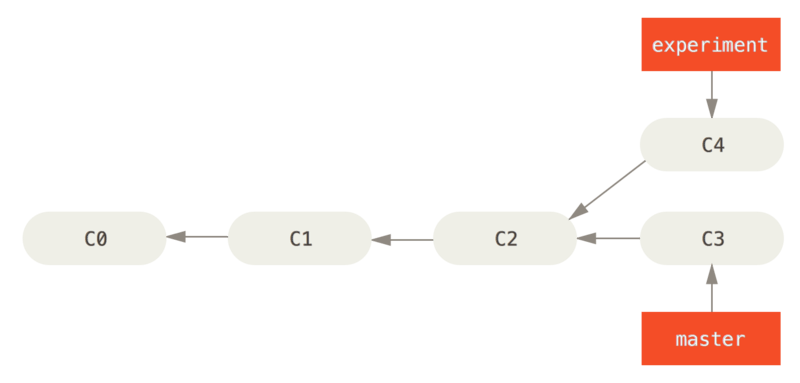
Simple divergent history
The easiest way to integrate the branches is the merge command. It performs a three-way merge between the two latest branch snapshots (C3 and C4) and the most recent common ancestor of the two (C2), creating a new snapshot (and commit).
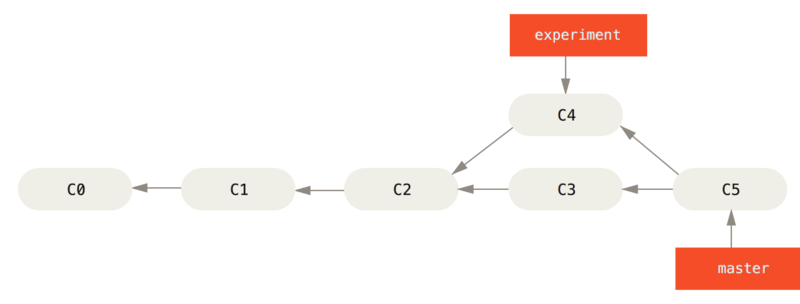
Merging to integrate diverged work history
However, you can also rebase: you can take the patch of the change that was introduced in C4 and reapply it on top of C3. With the rebase command, you can take all the changes that were committed on one branch and replay them on another one.
In this example, you’d run the following:
$ git checkout experiment
$ git rebase master
First, rewinding head to replay your work on top of it...
Applying: added staged command
It works by going to the common ancestor of the two branches (the one you’re on and the one you’re rebasing onto), getting the diff introduced by each commit of the branch you’re on, saving those diffs to temporary files, resetting the current branch to the same commit as the branch you are rebasing onto, and finally applying each change in turn.
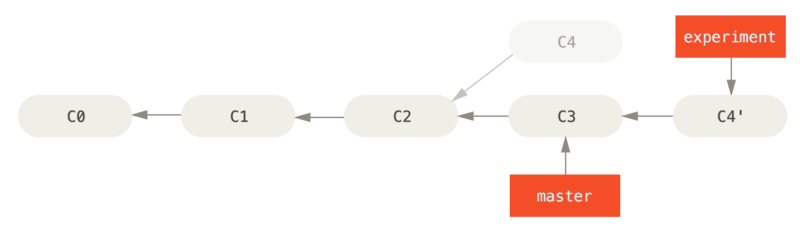
Rebasing the change introduced in C4 onto C3.
At this point, you can go back to the master branch and do a fast-forward merge.
$ git checkout master
$ git merge experiment
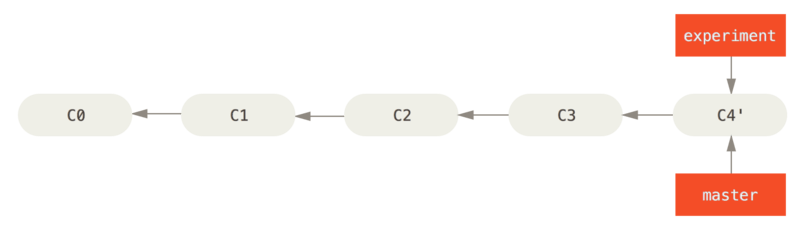
Fast-forwarding the master branch.
Now, the snapshot pointed to by C4' is exactly the same as the one that was pointed to by C5 in the merge example. There is no difference in the end product of the integration, but rebasing makes for a cleaner history. If you examine the log of a rebased branch, it looks like a linear history: it appears that all the work happened in series, even when it originally happened in parallel.
Often, you’ll do this to make sure your commits apply cleanly on a remote branch – perhaps in a project to which you’re trying to contribute but that you don’t maintain. In this case, you’d do your work in a branch and then rebase your work onto origin/master when you were ready to submit your patches to the main project. That way, the maintainer doesn’t have to do any integration work – just a fast-forward or a clean apply.
How to play with different branches
Sometimes, it might just be not possible to either merge or rebase two branches. In this context, the commands listed below might come useful:
$ git diff --name-status master..experimental     # this lists the files that have diffs between the two branches
$ git difftool master experimental -- filename    # this opens a difftool viewer (in my case, Meld), to analyze the diff between a file in two different branches
To pick a file from the master branch and move it into the experimental branch:
$ git checkout experimental
$ git checkout master -- modules/virtualContactGeneration/
Merge a branch into master
Unsafely
This is one very practice question, but all before answers are not practical.
$ git checkout master
$ git pull origin master
$ git merge test
$ git push origin master
Two issues arise:
- Not safe because we don’t know if there are any conflicts between test branch and master branch
- it would “squeeze” all test commits into one merge commit on master: on master branch, we can’t see the all the changelogs of test branch
Safely
$ git checkout test
$ git pull
$ git checkout master
$ git pull
$ git merge --no-ff --no-commit test
The latest command tests the merge before committing, and avoids a fast-forward commit by --no-ff; if conflicts appear, we can run git status to check details about the conflicts and try to solve them.
Once we solve the conflicts, or there are no conflicts at all, we can commit and push them:
$ git commit -m 'merge test branch'
$ git push
But in this way you will lose the changelogs in the test branch. Solution is, use rebase instead of merge (IF we have solved the branches conflicts). Please refer to http://git-scm.com/book/en/v2/Git-Branching-Rebasing for further info.
$ git checkout master
$ git pull
$ git checkout test
$ git pull
$ git rebase -i master
$ git checkout master
$ git merge test
The major benefit of rebasing is that you get a much cleaner project history. But there are some risks (see below).
IMPORTANT
The only thing you need to avoid is: never rebase a branch on master!. The rebase moves all of the commits in master onto the tip of test. The problem is that this only happened in your repository. All of the other developers are still working with the original master. Since rebasing rewrites history, git will think that your master branch’s history has diverged from everybody else’s.
The only way to synchronize the two master branches is to merge them back together, resulting in an extra merge commit and two sets of commits that contain the same changes (the original ones, and the ones from your rebased branch). Needless to say, this is a very confusing situation.
If you try to push the rebased master branch back to a remote repository, git will prevent you from doing so because it conflicts with the remote master branch. But, you can force the push to go through by passing the --force flag:
git push --force # Be very careful with this command!
This overwrites the remote master branch to match the rebased one from your repository and makes things very confusing for the rest of the team.
Remote URLs
List existing remote URL
In order to get the name of the remote URL, you need to do the following:
$ git remote -v
origin  https://github.com/USERNAME/REPOSITORY.git (fetch)
origin  https://github.com/USERNAME/REPOSITORY.git (push)
Change remote URL from HTTPS to SSH
In order to go from HTTPS to SSH, you need to use the remote set-url command:
$ git remote set-url origin git@github.com:USERNAME/REPOSITORY.git
Change remote URL
The same command is used to point your repository to another remote:
$ git remote set-url origin git@github.com:USERNAME/OTHERREPOSITORY.git
Configuring a remote for a fork
To sync changes you make in a fork with the original repository, you must configure a remote that points to the upstream repository in Git. To do so, you need to specify a new remote upstream repository that will be synced with the fork:
$ git remote add upstream https://github.com/ORIGINAL_OWNER/ORIGINAL_REPOSITORY.git
$ git remote -v
origin    git@github.com:USERNAME/REPOSITORY.git
origin    git@github.com:USERNAME/REPOSITORY.git
upstream  https://github.com/ORIGINAL_OWNER/ORIGINAL_REPOSITORY.git (fetch)
upstream  https://github.com/ORIGINAL_OWNER/ORIGINAL_REPOSITORY.git (push)
Forks
Syncing a fork
Syncing a fork of a repository aims at keeping it up-to-date with the upstream repository. Before you can sync your fork with an upstream repository, you must configure a remote that points to the upstream repository in Git.
Then, you need to fetch the branches and their respective commits from the upstream repository. Commits to master will be stored in a local branch, upstream/master:
$ git fetch upstream
remote: Counting objects: 75, done.
remote: Compressing objects: 100% (53/53), done.
remote: Total 62 (delta 27), reused 44 (delta 9)
Unpacking objects: 100% (62/62), done.
From https://github.com/ORIGINAL_OWNER/ORIGINAL_REPOSITORY
 * [new branch]      master     -> upstream/master
Check out your fork’s local master branch:
$ git checkout master
Switched to branch 'master'
Merge the changes from upstream/master into your local master branch. This brings your fork’s master branch into sync with the upstream repository, without losing your local changes.
$ git merge upstream/master
Updating a422352..5fdff0f
Fast-forward
 README                    |    9 -------
 README.md                 |    7 ++++++
 2 files changed, 7 insertions(+), 9 deletions(-)
 delete mode 100644 README
 create mode 100644 README.md
If your local branch didn’t have any unique commits, Git will instead perform a “fast-forward”:
$ git merge upstream/master
Updating 34e91da..16c56ad
Fast-forward
 README.md                 |    5 +++--
 1 file changed, 3 insertions(+), 2 deletions(-)
Stashing your work
git stash does the following:
- Saves your working directory and index to a safe place.
- Restores your working directory and index to the most recent commit.
You can then work on other branches, make commits, etc. and when you’re ready to get back to where you were, you type git stash pop and you’re back, working at full speed.
Example: working normally
Before you start git stashing, make sure any new files added to the working directory have been added to the index: git stash will not stash (save) files in the working directory unless the files are being tracked (some version of the file has been added to the index).
Let’s create a repository, add a file, and make the first commit:
$ git init
Initialized empty Git repository ...
$ echo This is the README file. > README
$ git add README
$ git commit -m'Initial commit'
[master (root-commit) 35ede5c] Initial commit
 1 files changed, 1 insertions(+), 0 deletions(-)
 create mode 100644 README
Next we’ll make some changes to the working directory:
- i) add a line to
README - ii) dd a new file,
file2
$ echo ADD TO THE WORKING DIRECTORY VERSION OF README >> README
$ echo file2 is here > file2
$ ls
file2  README
We Get Interrupted
Now we find out about the bug we need to fix in another branch. Our goal is to stash (save) the changes that we had made to the working directory, go to the other branch and then eventually return to right before we heard about that bug.
We first need to add the new file, file2, to the index, so git will track the file and know to save the file during the git stash:
$ git add file2
We don’t need to add README to the index since that file path was already in the index: Git will notice that the working directory version is newer than the index and will stash it. Now we’re ready for the stashing:
$ git stash
Saved working directory and index state WIP on master: 8d8b865 Initial commit
HEAD is now at 8d8b865 Initial commit
$ ls
README
$ cat README
This is the README file.
By doing so, the changes we had made to the working directory, are squirreled away somewhere to somewhere safe. Further, the working directory is set back to its state before the modifications were made. In particular: file2 was removed, and the README no longer has the second line.
Work on another branch or two
Now we can do anything we want, such as git checkout other-branch, make modifications, fix bugs, and commit the fix to that branch. When we’re ready to continue where we left off, we simply type git stash pop and our “stashed” working directory is back where it was when we had typed git stash:
$ git stash pop
# On branch master
# Changes to be committed:
#   (use "git reset HEAD ..." to unstage)
#
#   new file:   file2
#
# Changed but not updated:
#   (use "git add ..." to update what will be committed)
#   (use "git checkout -- ..." to discard changes in working directory)
#
#   modified:   README
#
Dropped refs/stash@{0} (9c72eaeebdb712ad527f06f88a5cbec1098957f1)
$ ls
file2  README
$ cat README
This is the README file.
ADD TO THE WORKING DIRECTORY VERSION OF README
Commit-related tricks
Interactive rebasing
Rebasing interactively means that you have a chance to edit the commits which are rebased. You can reorder the commits, and you can remove them (weeding out bad or otherwise unwanted patches). Start it with the last commit you want to retain as-is:
$ git rebase -i <after-this-commit>
For example, let’s assume that you want to reorder the last 5 commits, such that what was HEAD~4 becomes the new HEAD. To achieve that, you would call git rebase like this:
$ git rebase -i HEAD~5
An editor will be fired up with all the commits in your current branch (ignoring merge commits), which come after the given commit. You can reorder the commits in this list to your heart’s content, and you can remove them. The list looks more or less like this:
pick deadbee The oneline of this commit
pick fa1afe1 The oneline of the next commit
...
The oneline descriptions are purely for your pleasure; git rebase will not look at them but at the commit names (“deadbee” and “fa1afe1” in this example), so do not delete or edit the names. NOTE: remember to close the application you use to edit this file in order for the rebase to continue its work. If you close only the tab, you will get stuck in the edit mode.
By replacing the command “pick” with the command “edit”, you can tell git rebase to stop after applying that commit, so that you can edit the files and/or the commit message, amend the commit, and continue rebasing.
If you just want to edit the commit message for a commit, replace the command “pick” with the command “reword”.
To drop a commit, replace the command “pick” with “drop”, or just delete the matching line.
If you want to fold two or more commits into one, replace the command “pick” for the second and subsequent commits with “squash” or “fixup”. If the commits had different authors, the folded commit will be attributed to the author of the first commit. The suggested commit message for the folded commit is the concatenation of the commit messages of the first commit and of those with the “squash” command, but omits the commit messages of commits with the “fixup” command.
git rebase will stop when “pick” has been replaced with “edit” or when a command fails due to merge errors. When you are done editing and/or resolving conflicts you can continue with git rebase --continue.
Splitting Commits
In interactive mode, you can mark commits with the action “edit”. However, this does not necessarily mean that git rebase expects the result of this edit to be exactly one commit. Indeed, you can undo the commit, or you can add other commits. This can be used to split a commit into two:
-
Start an interactive rebase with
git rebase -i <commit>^, where<commit>is the commit you want to split. In fact, any commit range will do, as long as it contains that commit. -
Mark the commit you want to split with the action “edit”.
-
When it comes to editing that commit, execute
git reset HEAD^. The effect is that theHEADis rewound by one, and the index follows suit. However, the working tree stays the same. -
Now add the changes to the index that you want to have in the first commit. You can use
git add(possibly interactively) orgit gui(or both) to do that. -
Commit the now-current index with whatever commit message is appropriate now.
-
Repeat the last two steps until your working tree is clean.
-
Continue the rebase with
git rebase --continue.
If you are not absolutely sure that the intermediate revisions are consistent (they compile, pass the testsuite, etc.) you should use git stash to stash away the not-yet-committed changes after each commit, test, and amend the commit if fixes are necessary.
Switch to a different commit back in time
Temporarily switch
In order to temporarily go back to a previous commit, fool around, then come back to the master, all you have to do is check out the desired commit:
$ git checkout 0d1d7fc32
This will detach your HEAD, that is, leave you with no branch checked out.
Branch out from that commit
In order to make commits from that commit, a new branch is needed:
$ git checkout -b old-state 0d1d7fc32
Hard delete commits
To get rid of everything you’ve done since then, there are two possibilities.
Hard delete unpublished commits
If those commits have not been published yet, simply reset:
$ git reset --hard 0d1d7fc32
This will destroy any local modifications. Don’t do it if you have uncommitted work you want to keep.
Alternatively, if there’s work to keep:
$ git stash
$ git reset --hard 0d1d7fc32
$ git stash pop
This saves the modifications, then reapplies that patch after resetting. You could get merge conflicts, if you’ve modified things which were changed since the commit you reset to. If you mess up, you’ve already thrown away your local changes, but you can at least get back to where you were before by resetting again.
Undo published commits with new commits
On the other hand, if you’ve published the work, you probably don’t want to reset the branch, since that’s effectively rewriting history. In that case, you could indeed revert the commits. With git, revert has a very specific meaning: create a commit with the reverse patch to cancel it out. This way you don’t rewrite any history.
This will create three separate revert commits:
$ git revert a867b4af 25eee4ca 0766c053
It also takes ranges. This will revert the last two commits:
$ git revert HEAD~2..HEAD
Reverting a merge commit
$ git revert -m 1 <merge_commit_sha>
To get just one, you could use rebase -i to squash them afterwards. Or, you could do it manually (be sure to do this at top level of the repo) get your index and work tree into the desired state, without changing HEAD:
$ git checkout 0d1d7fc32 .
Then commit. Be sure and write a good message describing what you just did!
$ git commit
The git-revert manpage actually covers a lot of this in its description. Another useful link is this git-scm.com blog post discussing git-revert.
If you decide you didn’t want to revert after all, you can revert the revert (as described here) or reset back to before the revert (see the previous section).
Tagging
Like most VCSs, Git has the ability to tag specific points in history as being important. Typically people use this functionality to mark release points (v1.0, and so on).
Listing the available tags in Git is straightforward. Just type git tag:
$ git tag
v0.1
v1.3
This command lists the tags in alphabetical order; the order in which they appear has no real importance.
Creating annotated tags
Creating an annotated tag in Git is simple. The easiest way is to specify -a when you run the tag command:
$ git tag -a v1.4 -m 'my version 1.4'
$ git tag
v0.1
v1.3
v1.4
The -m specifies a tagging message, which is stored with the tag. If you don’t specify a message for an annotated tag, Git launches your editor so you can type it in. You can see the tag data along with the commit that was tagged by using the git show command:
$ git show v1.4
tag v1.4
Tagger: Ben Straub <ben@straub.cc>
Date:   Sat May 3 20:19:12 2014 -0700

my version 1.4

commit ca82a6dff817ec66f44342007202690a93763949
Author: Scott Chacon <schacon@gee-mail.com>
Date:   Mon Mar 17 21:52:11 2008 -0700

    changed the version number
That shows the tagger information, the date the commit was tagged, and the annotation message before showing the commit information.
Creating annotated tags for past commits
$ git tag -a v1.2 9fceb02 -m "Message here"
Where 9fceb02 is the beginning part of the commit id. You can then push them up using
Pushing tags
By default, the git push command doesn’t transfer tags to remote servers. You will have to explicitly push tags to a shared server after you have created them. This process is just like sharing remote branches - you can run git push origin [tagname]:
$ git push origin v1.5
If you have a lot of tags that you want to push up at once, you can also use the --tags option to the git push command. This will transfer all of your tags to the remote server that are not already there.
$ git push --tags origin master
Now, when someone else clones or pulls from your repository, they will get all your tags as well. Here is a good chapter on tagging.
Ignore tracked files
In most projects/repositories, there are some files whose default version is important to track, but that change very often and whose change is machine dependent (e.g. configuration files) or is a consequence of automatic change while building the code. Usually, you don’t want to un-track them, you just don’t want them to appear as modified and you don’t want them to be staged when you git add. The command is the following:
$ git update-index --assume-unchanged [<file> ...]
Git will fail (gracefully) in case it needs to modify this file in the index e.g. when merging in a commit; thus, in case the assumed-untracked file is changed upstream, you will need to handle the situation manually.
Importantly, in order to undo the previous command and start tracking again, use:
$ git update-index --no-assume-unchanged [<file> ...]
What if I forgot what files were untracked?
You can use git ls-files -v. If the character printed is lower-case, the file is marked assume-unchanged.
To print just the files that are unchanged use:
$ git ls-files -v | grep '^[[:lower:]]'
To embrace your lazy programmer, turn this into a git alias. Edit your .gitconfig file to add this snippet:
[alias]
    ignored = !git ls-files -v | grep "^[[:lower:]]"
Now typing git ignored will give you output like this:
h path/to/ignored.file
h another/ignored.file